Sony Bravia Video App Please Try Again Later
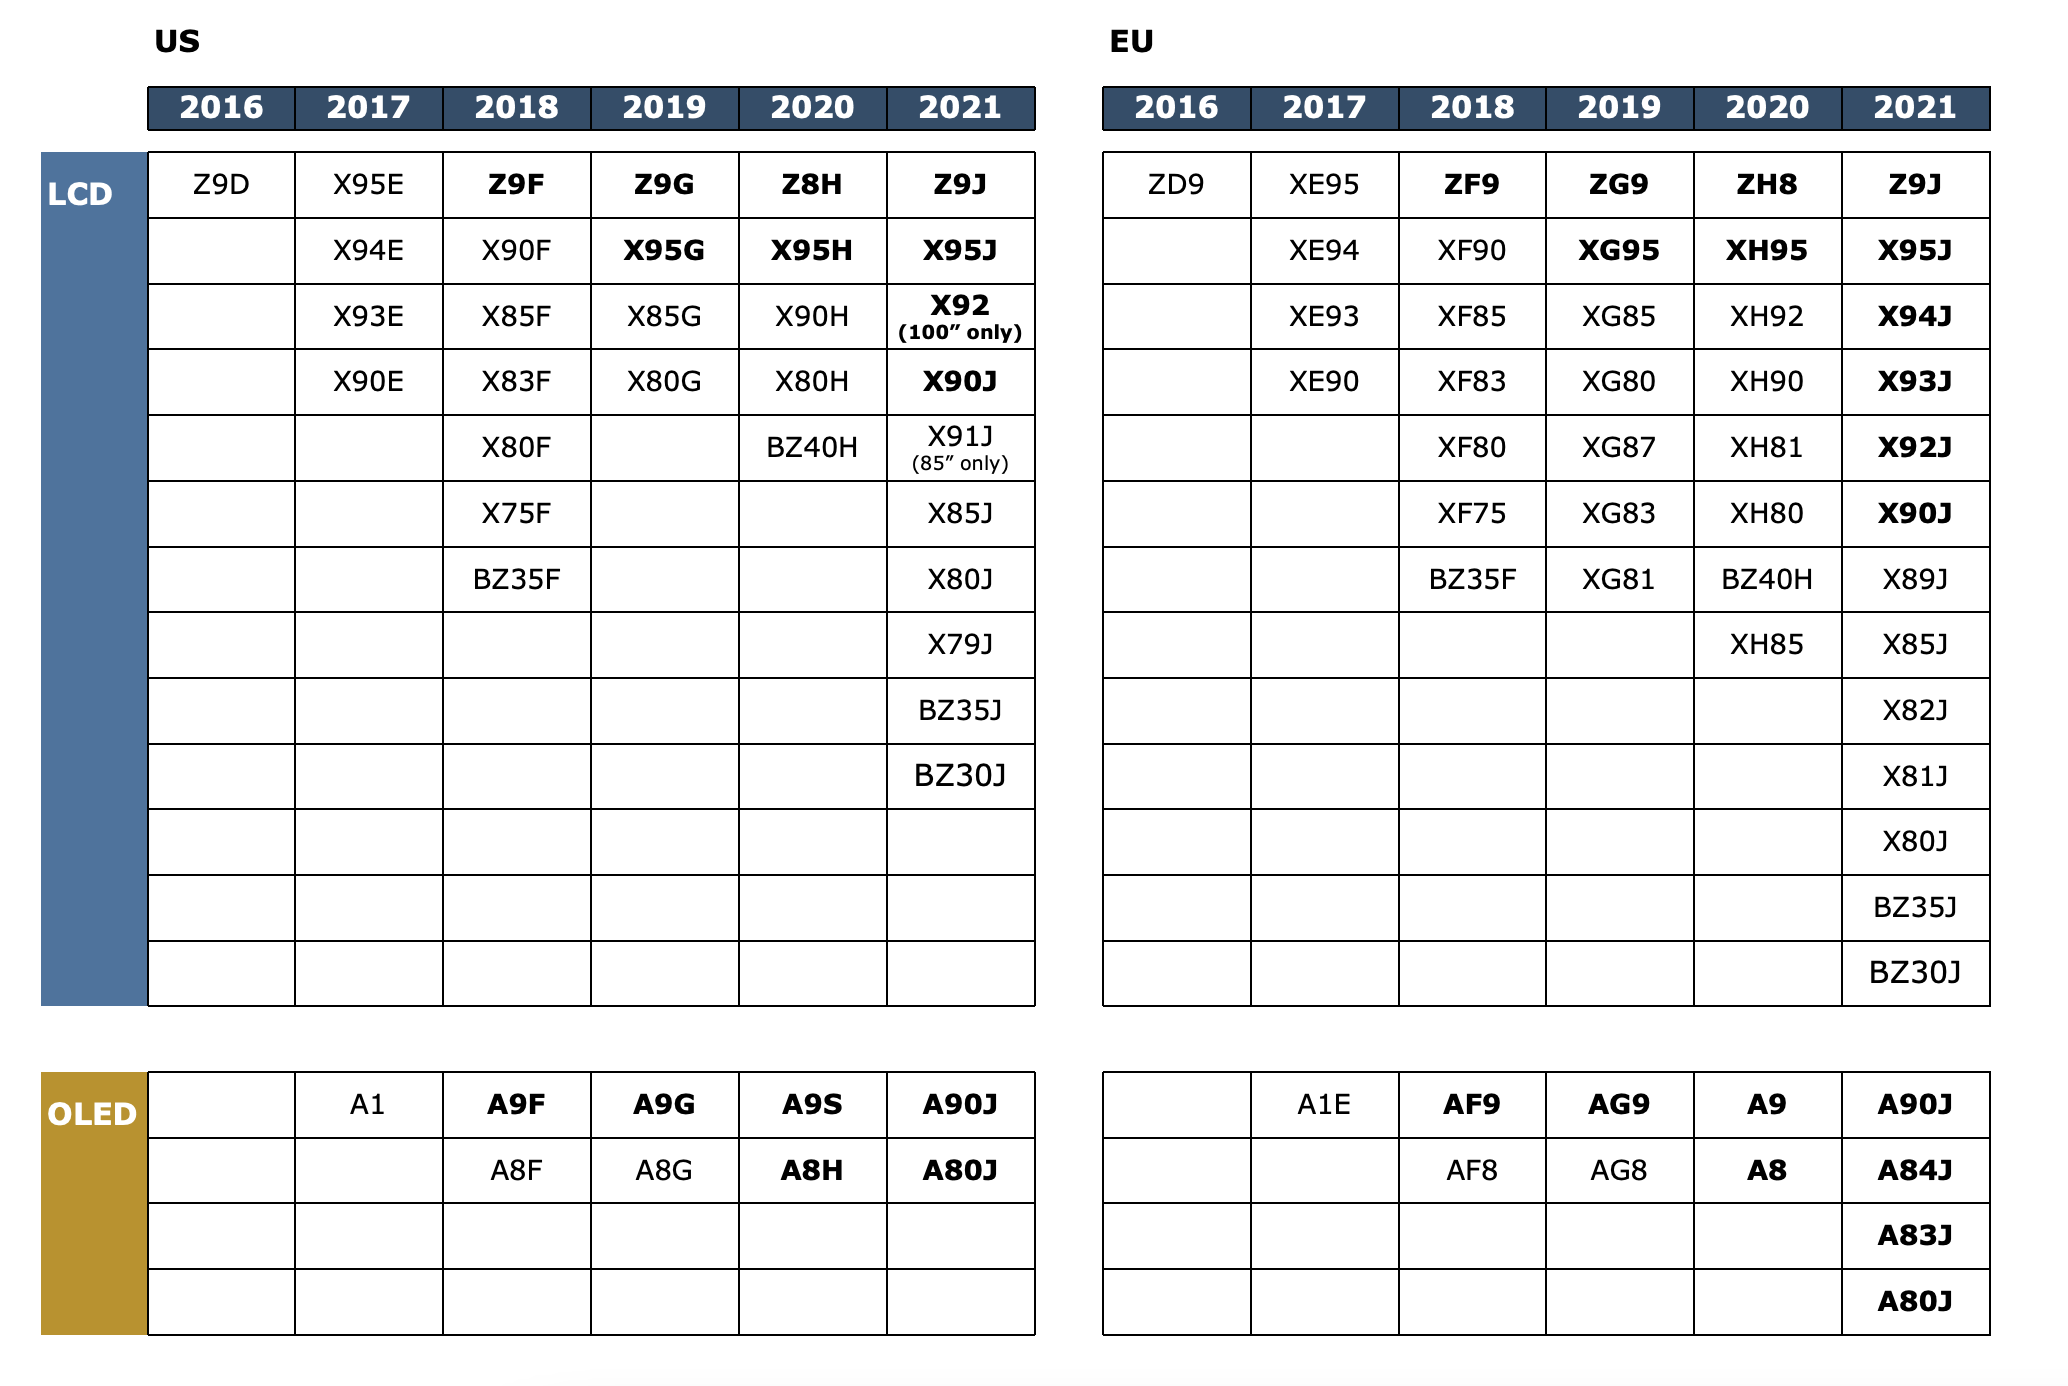
This guide designed as a reference to the Sony BRAVIA Workflow, used to calibrate Sony'south upper-end Android TVs including Z9D and subsequent LCD and OLED models with Calman.

The BRAVIA workflow is used to calibrate Sony'south upper-end Android TVs including Z9D and subsequent LCD and OLED models. This workflow will walk yous through the process footstep-past-step, pre-configures most needed Calman Settings.
The workflow options are pre-configured then in one case connected over DDC, yous volition just accept to click "AutoCal" button on each of the following pages (Luminance, Grayscale, and Colorspace) to calibrate.
- Calman Required Version
- Calman 2018 R2 v5.9.ane or newer
- Required Hardware
- Calman Compatible Pattern Generator
- For information come across Calman Compatible Pattern Generators
- An HDR capable pattern generator is only required if HDR validation is required. See notation below
- Calman Uniform Meter
- For information run into Calman Compatible Meters
- Calman Compatible Sony TV
- Must be running Android 8.0 or higher to download Calman for Bravia
- Note: 8.0 update currently delayed in European Market. For more than info meet this Sony Support Article
- Must be running Android 8.0 or higher to download Calman for Bravia
- Calman Compatible Pattern Generator
Note:
- Calibration capability varies by model and is determined by the Calman for BRAVIA app
- Models in Bold volition back up AutoCal for...
- Custom one and 2 picture modes
- Luminance
- 20 signal Greyscale
- Color Gamut
- All other models listed support...
- Custom Picture mode
- Luminance
- 10 indicate Grayscale
- The Calman for BRAVIA app that is developed by Sony reports dorsum to CalMAN what features the TV is capable of. Always ensure that you're running the latest firmware on the Television set and the latest version of the Calman for BRAVIA app.
HDR Calibration Note
- The calibration of SDR (ii.ii Gamma, D65, Rec 709) is automatically applied to HDR and other gamma formulas.
- You can validate it by changing Calman and your Pattern Generator to HDR settings (2.ii Gamma, D65, BT.2020, and retaking all the measurements by Read Series.
- HDR Compatible Design Generator required for validation
- VideoForge PRO
- Murideo Six-One thousand
- HDR Compatible Design Generator required for validation
- You tin can do so in the Validation section of this workflow, but for checking HDR, we highly recommend y'all to use HDR Analysis workflow instead.
SDR Calibration
Step i

- From the Calman Menu in the pinnacle-left, choose Open Workflow Template -> Display Specific and thenAutoCal - Sony BRAVIA
Step 2
Now, you will connect and configure your calibration hardware

- Connect Your Meter
- Plug your meter into a USB port on the computer and press the Find Meter push on the left
- When your meter is connected, select your display blazon from the dropdown (this will vary by meter)
- OLED: White-OLED (OLED (White) LG, Panasonic, FSI 2018 for C6 Meter)
- LCD: Varies past model and year. 2018 Master Series LCDs are PFS Phosphor
- When your meter is connected, select your display blazon from the dropdown (this will vary by meter)
- Plug your meter into a USB port on the computer and press the Find Meter push on the left
- Connect Pattern Source to your estimator
- Click the Observe Source button so select your source
- Select the pattern window size
- OLED: Window 10%
- LCD: Constant APL x
- Install the app
- Make certain your Television continued to the Internet, then open up Google Play Store on your Idiot box.
- Search for and install an app called Calman for BRAVIA
- Annotation: If the app does not appear...
- Your TV may not be a compatible model
- Your TV may not exist updated to Android 8.0
- Android 8.0 update may exist delayed in the European Market. For more info see this Sony Back up Article
- Annotation: If the app does not appear...
Footstep 3
Confirm your calibration targets
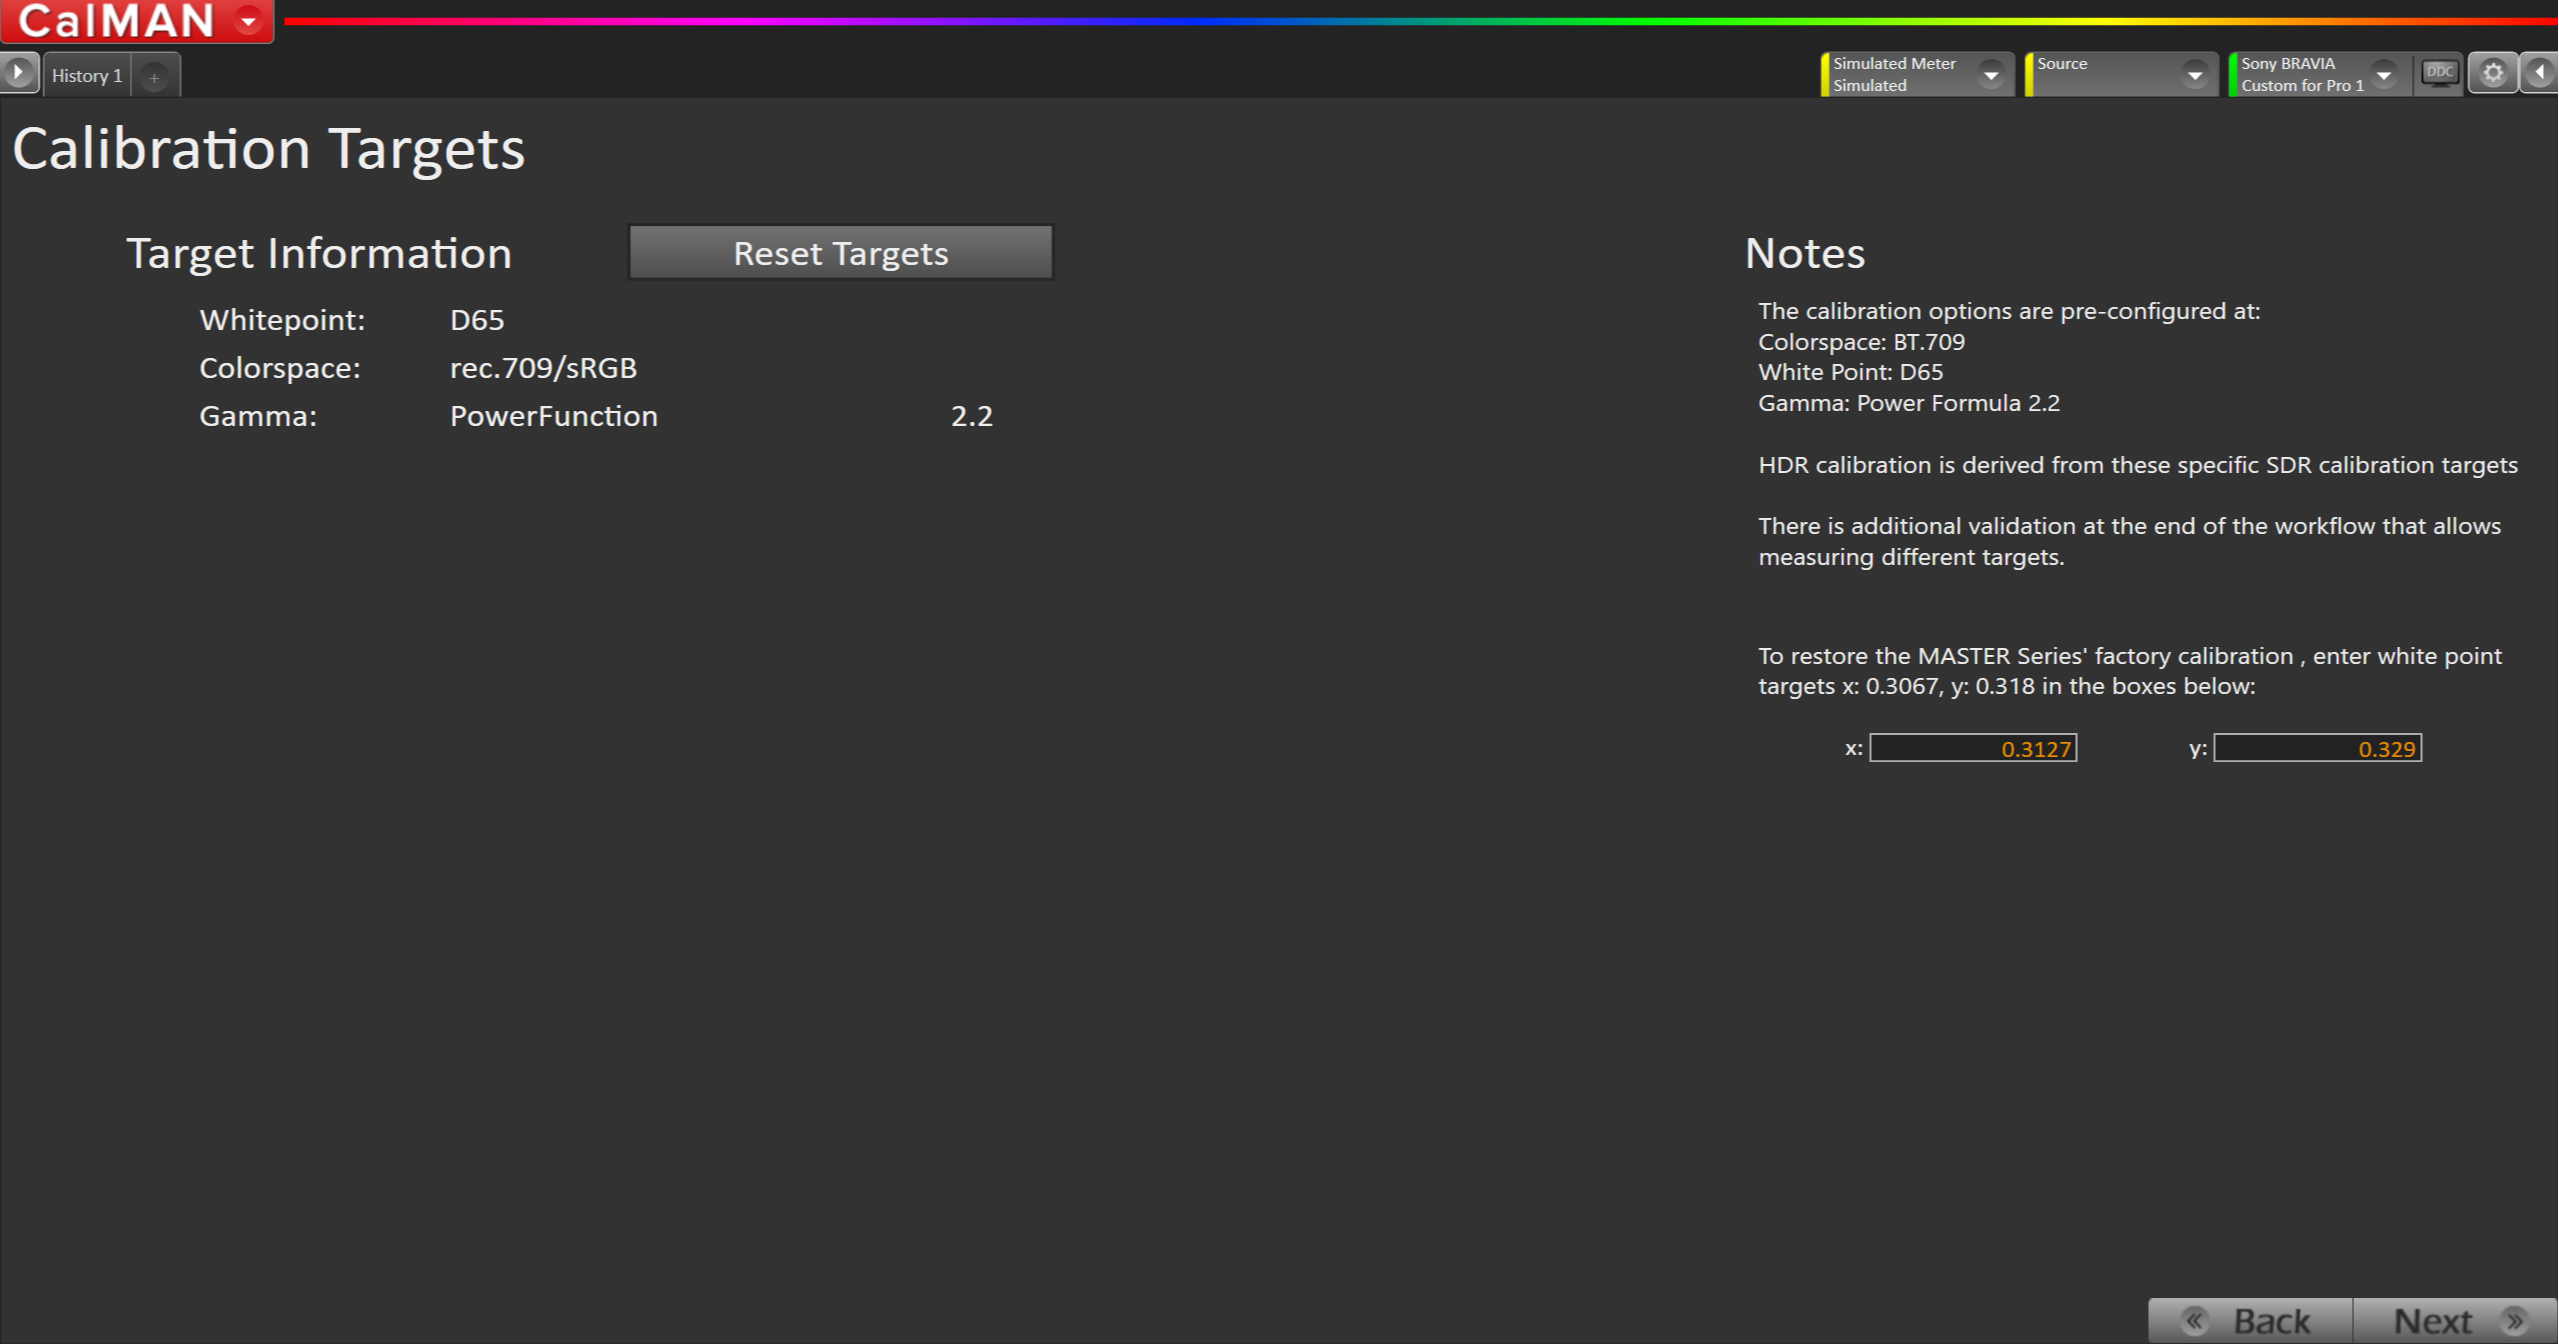
The calibration options are pre-configured at:
- Colorspace: BT.709
- White Point: D65
- Gamma: Power Formula 2.ii
HDR calibration is derived from these specific SDR calibration targets. There is additional validation at the end of the workflow that allows measuring different targets.
To restore the Principal Series' factory calibration, enter white bespeak targets x: 0.3067, y: 0.318
Step 4

Full Field Blueprint Insertion (OLED Only)
To prevent an OLED brandish from inbound its car-dimming mode during extended measurements, the Calman Pattern Insertion feature periodically inserts a different examination design during extended test pattern measurements, to reset the brandish'due south auto-dimming timer.
-
Click theGear up OLED Defaultto automatically configure and enable the best settings for OLED panels.
- This will set...
- Frequency: thirty (seconds)
- Duration: five (seconds)
- Level: 15%
- This will set...
Step 5
In this footstep, y'all'll take readings of your brandish before the scale. These volition be used to compare your calibration results
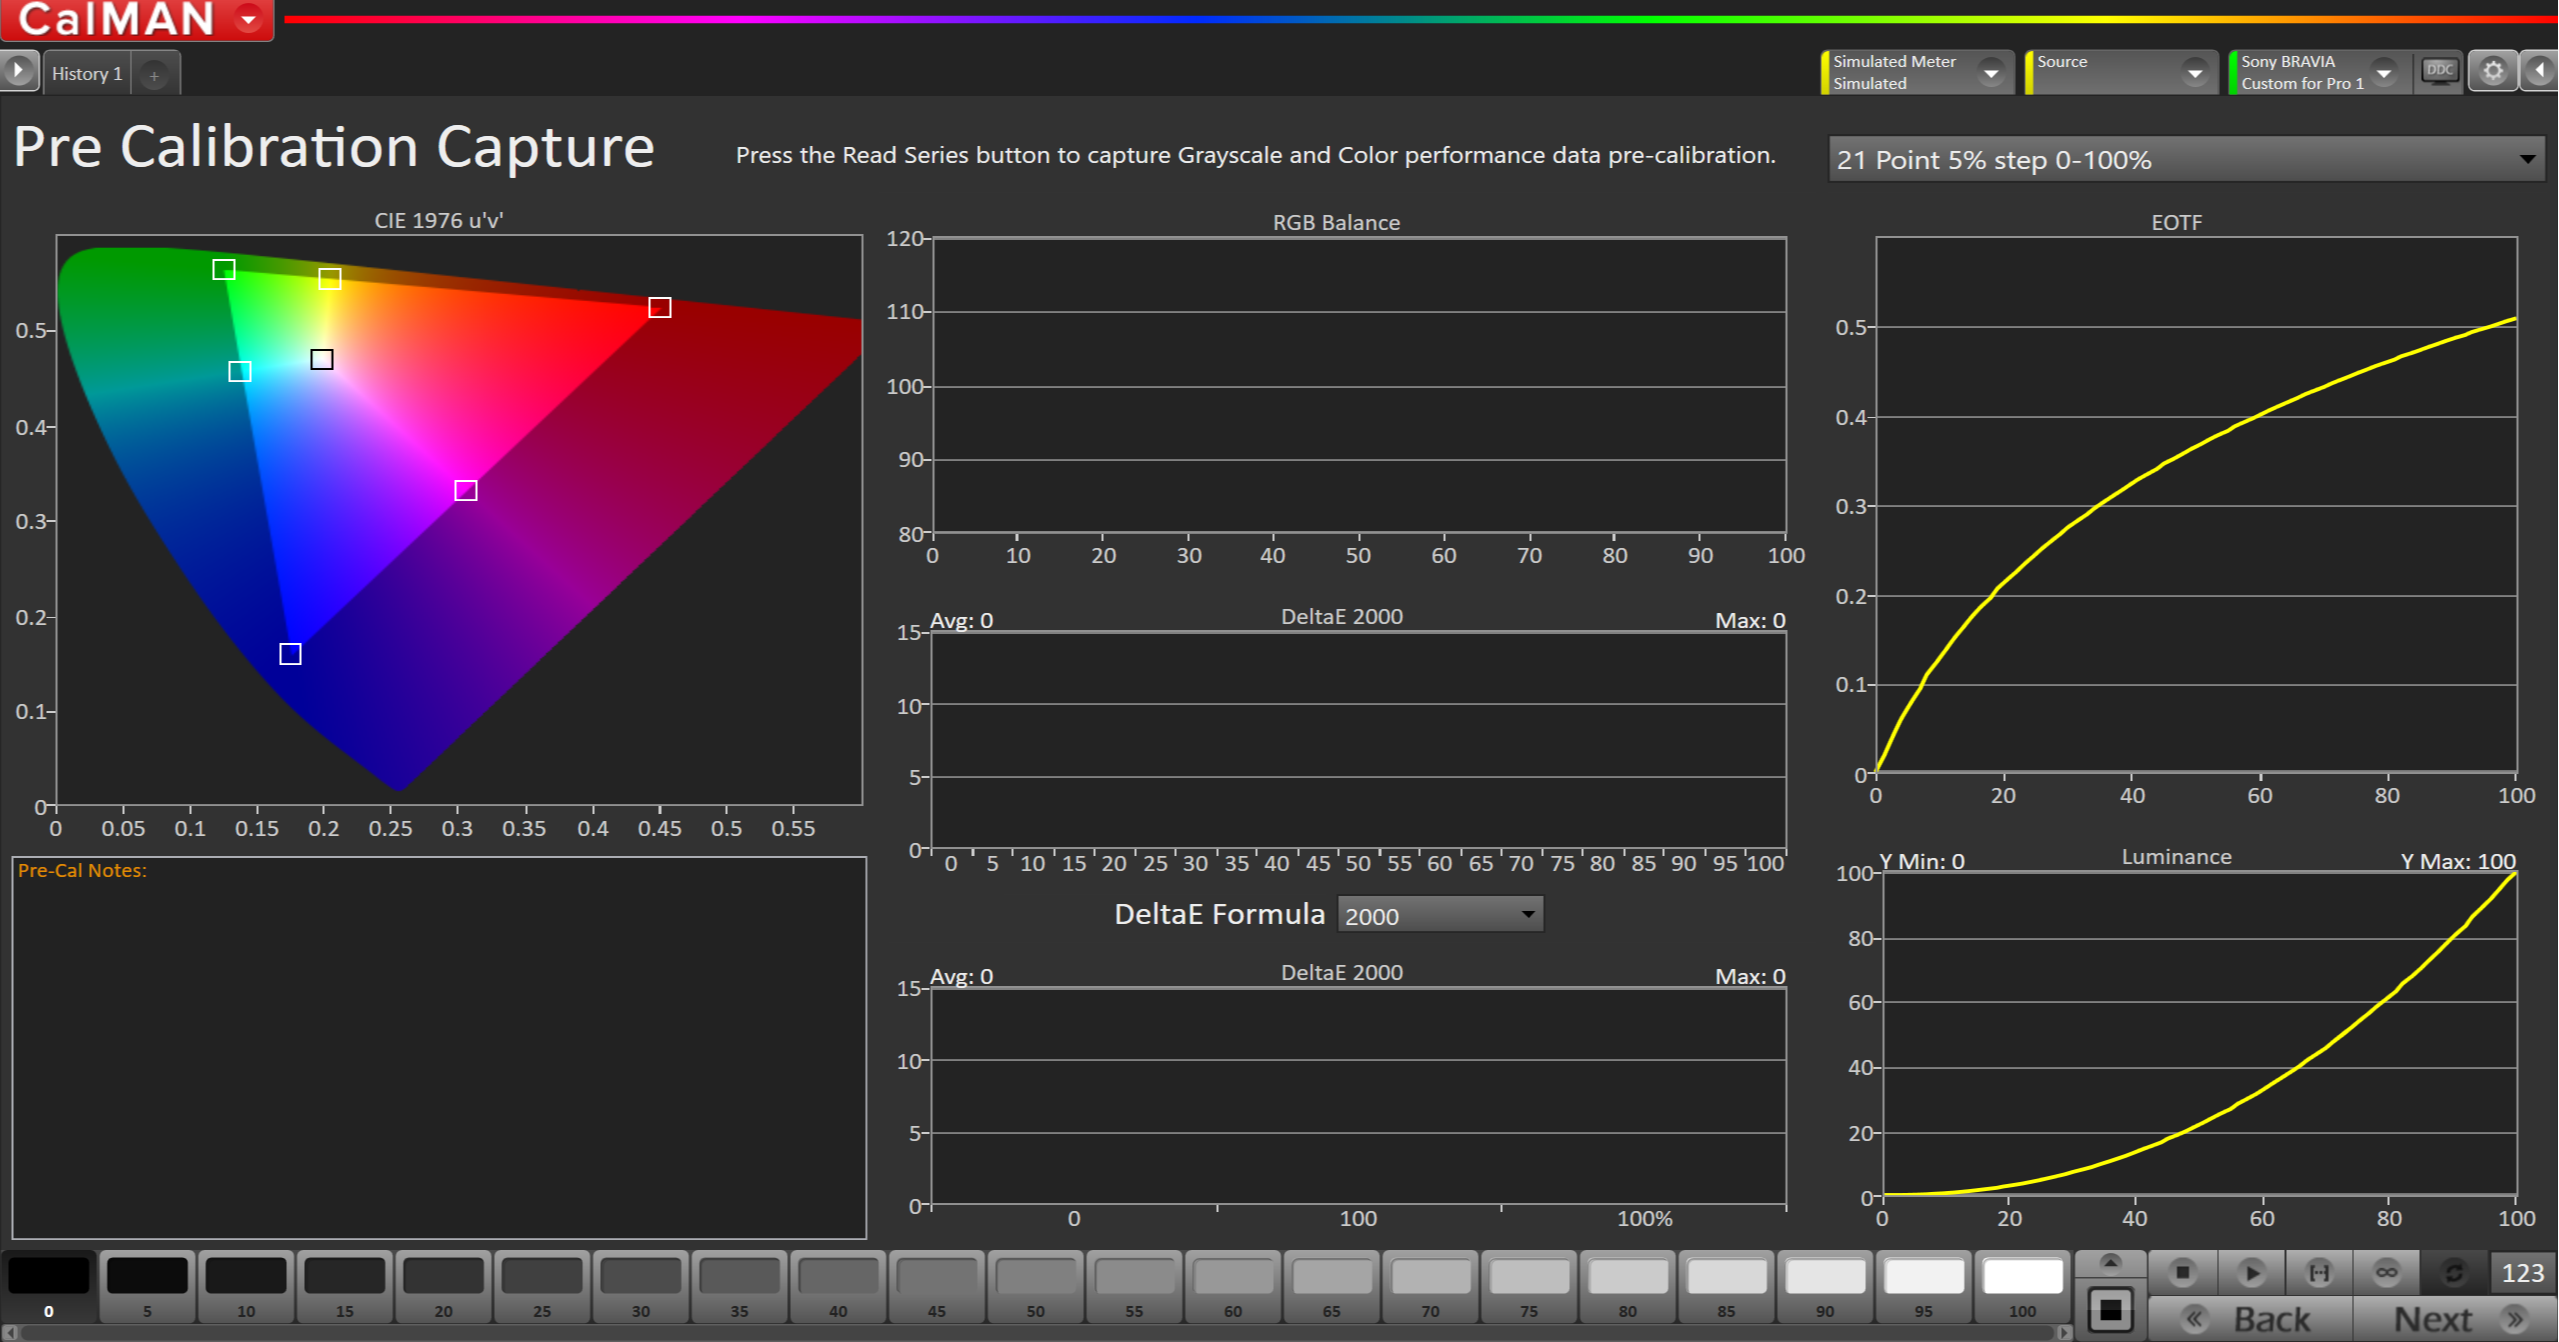
- To take Pre-Calibration Measurements click theRead Series [...] button to measure the brandish's grayscale and ColorChecker response
- This volition provide a point of reference to compare your calibration results
Step half dozen
Select and prepare your Target Picture show Mode

- Using the picture mode dropdown carte du jour, or in the Brandish Command dropdown, select which moving-picture show fashion you would like to calibrate.
- Options are Custom for Pro i or Custom for Pro 2 (on some models). Luminance and CMS data will be saved onto the specified Picture Style.
- Also by using the colour temperature dropdown menu, select where you would like to salve the grayscale scale.
- After selecting your picture mode, click the Full DDC Reset push button. This resets and prepares the picture mode for calibration.
Pace vii
In this step, yous'll take readings of your display before the calibration. These will be used to compare your calibration results

- To take Pre-Scale Measurements click the Read Series [...] push to measure the display'due south grayscale and ColorChecker response
- This volition provide a indicate of reference to compare your calibration results
Step viii
In this step, you will exist able to accommodate the Luminance of your brandish to match your desired target.

- Click theAutoCal Button
- Enter the target luminance value
- Click OK to AutoCal luminance
Step nine
Hither Calman volition adapt the Multipoint Greyscale of your brandish

- Press the AutoCal push and select the correct data points in the AutoCal Dialog to auto-calibrate the Grayscale/Luminance response on your display.
- Y'all will be offered the correct number of greyscale points for your display
- Click OK to begin greyscale AutoCal
Step 10
Here Calman volition arrange the Color Gamut of your display

- Click AutoCal Button in lower-right of Calman
- In AutoCal Dialog, the CMS values are automatically selected, click OK to start AutoCal
- Notation: If CMS on picture modes other than Custom for Pro 1/2 has to be adapted, see the CMS calibration result on DDC Window (HSL values), and adjust exactly the same on the modes of your choice.
Step 11
In this pace, yous will be verifying the Luminance of your display after the calibration has been done

It'south common for a small amount of luminance is lost after calibration, hither you will AutoCal to your target once again to make final fine adjustments.
- Click theAutoCal Push button
- Enter the target luminance value
- Click OK to AutoCal luminance
Step 12
Mail service-calibration readings to certificate the postal service-calibration condition of the display.

- Click the Read Series [...] button
SDR Scale is complete.
(OPTIONAL) Culling Gamma Verification
This workflow is setup to calibrate to ii.ii gamma. If y'all would similar to validate an alternate gamma value, enter it in the gamma field on the Verification Options page. And then use the "Display Controls" to the right to change the Television set's gamma formula to match the value you entered in the field higher up.
Note: In one case an alternate gamma is selected use the mail-calibration to verify the results. Previous workflow validation pages volition compare to the adjusted gamma value.
Source: https://calmankb.groovehq.com/help/sony-bravia-master-series-guide
0 Response to "Sony Bravia Video App Please Try Again Later"
Post a Comment